This article was originally published on RealLifeDIY
Repurpose An Entertainment Center
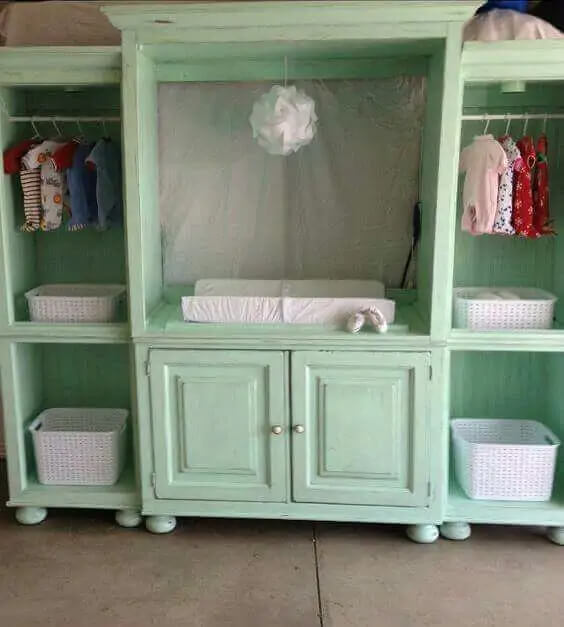
As far as furniture goes, entertainment centers usually aren't the most attractive pieces found in someone's home. They're big, clunky, and really only serve to hold your T.V. However, they can be pretty versatile items for upcycling. Take this photo for example. All this person had to do was add a fresh coat of paint and take the back of the entertainment center off and they were left with a cute baby station.
The backboards on these pieces usually come off with a couple of screws, but you don't have to just use it as a baby station. They can also be used as display cabinets or wardrobes.
Upcycle An Old Rake
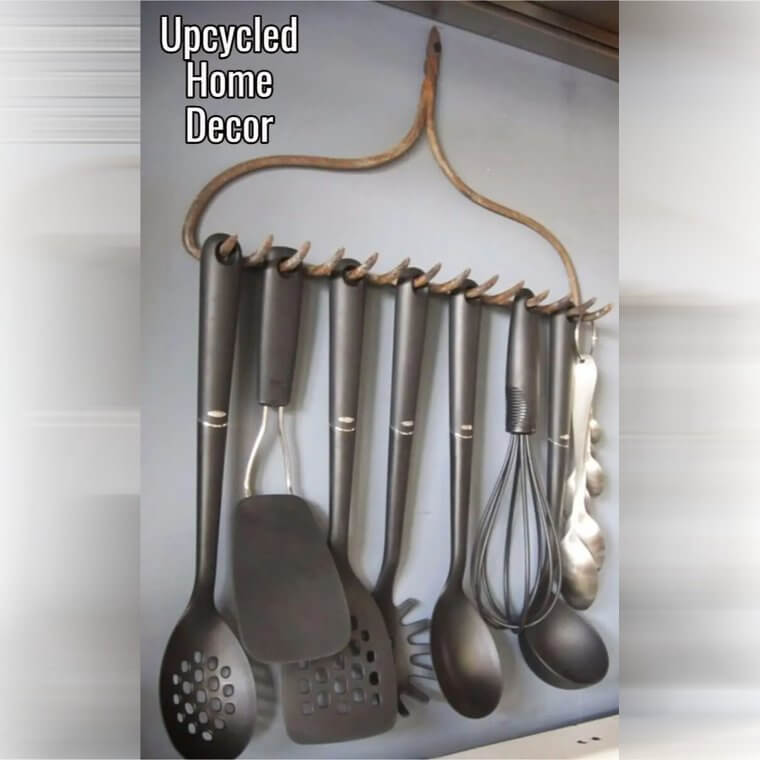
This idea is incredibly simple but it's also pretty clever. All you need of course is a metal rake, preferably one with a good bit of patina to it. All you have to do is detach the rake from its handle, which usually requires little more than a screwdriver. The rake can then hang on your kitchen wall to hold any utensils you might have lying around the kitchen.
This is a great way to add a farmhouse-inspired look to just about any kitchen. If you want to go a step further, you could swap out the plastic utensils pictured here for a set of aluminum ones.
Turn A Headboard Into A Bench
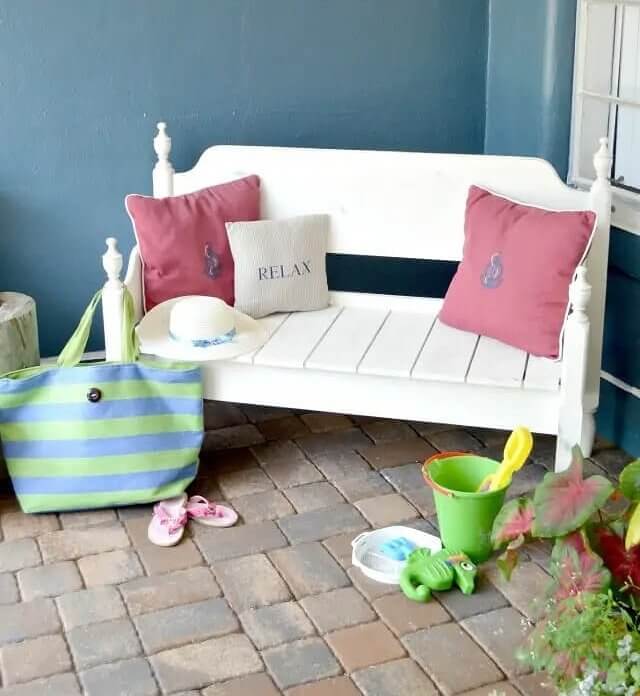
A lot of people have a set of twin-sized beds just lying around the house. Children can quickly outgrow them and then you're just left with furniture that takes up space. However, these can be easily converted into benches for either indoor or outdoor use. Directions for this type of project are easily found online, but you basically convert the headboard into a backrest and the footboard acts as the bench's armrests.
You might need a saw and drill, as well as a few extra planks for the seat, but the construction is really simple. The cuts are basic, too. If you want to go a step further, you could even add a few hinges and turn the seat into a chest for storage.
DIY Headboard
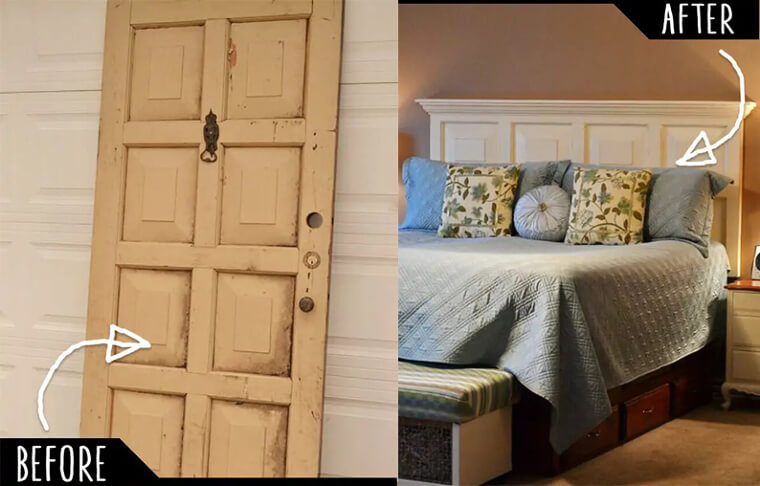
Doors are one of the most versatile home items to work with and upcycle. They're basically just a set of solid-wood boards that can be repurposed for just about anything. However, turning them into headboards is one of the most popular DIY projects out there. All you need is a drill and you're pretty much finished. You just take the door, drill it to the wall using screws, and you have a new headboard.
Of course, you could go even further and attach the door to your bed frame or add a fresh coat of paint. Adjustments are also easy to make and only require a couple of simple cuts to make them proportional to your bed's size.
Create An Arbor Walkway
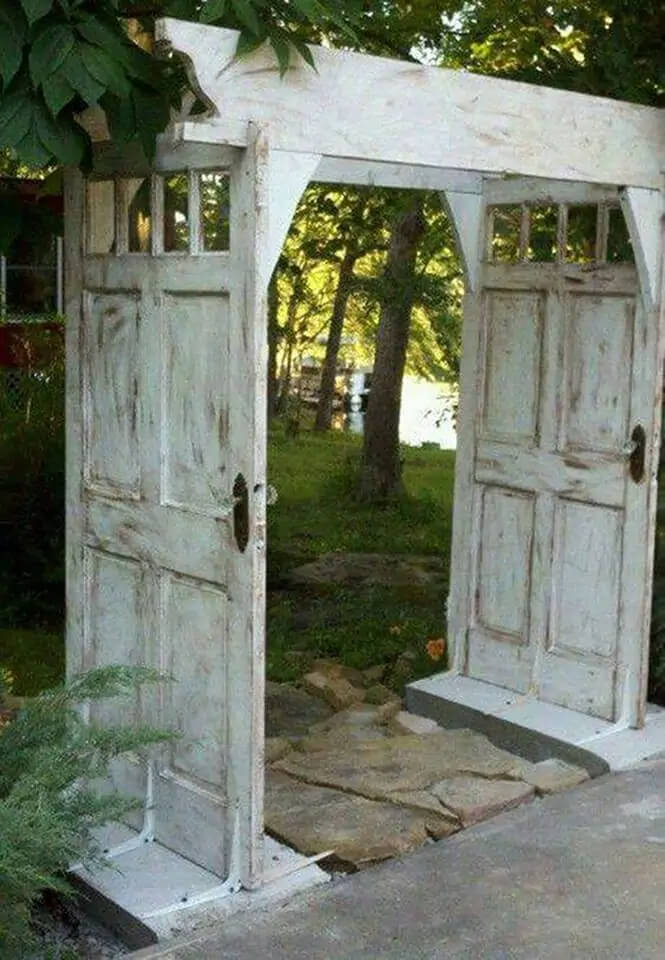
Here is another pretty cool idea to upcycle any old doors you might come across or just have lying around your home. They can easily be upcycled into a patina-rich arbor walkway for your yard. All you need is a saw, drill, and a couple of extra boards. You also don't have to stick with this particular design and could pretty much construct the top however you see fit.
While this person used a couple of interior brackets to stabilize the bottom, you could easily switch it up with some small boards or antique brackets to keep with the look.
DIY Towel Rack
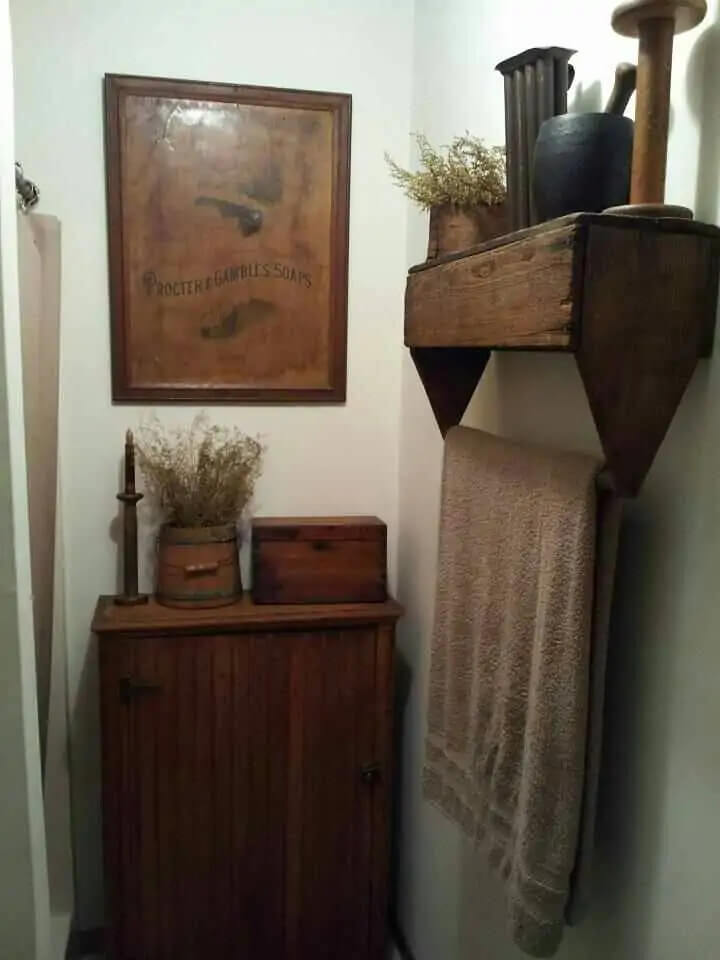
You can find old, wooden tool boxes at just about any flea market out there and they're usually pretty cheap. If you aren't sure what to do with them then consider turning them into towel racks for your bathroom or kitchen. They're great for adding a rustic look to just about any room and you can even give them a fresh coat of paint to fit with whatever aesthetic you already have going on.
A side benefit is that they act as great shelves because you can then place whatever you want on top of them. If you have one with some cool old logos and you don't want to turn them upside down then just use them to store items in your kitchen.
Create A Custom Picture Frame
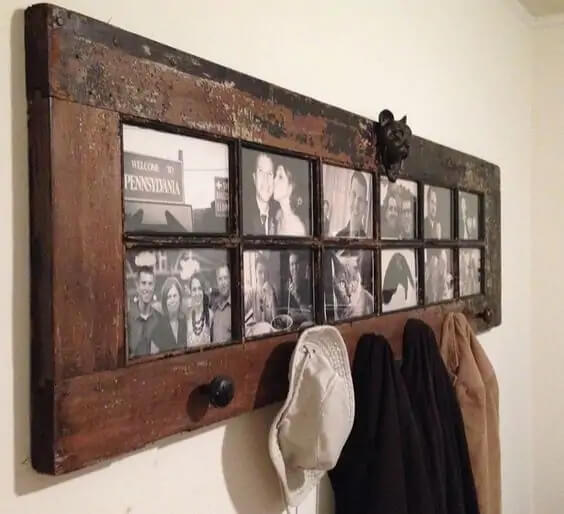
Most of the doors we've looked at so far have been solid wood, but if you have a door with window panes then you also have project options. Someone turned this old French door into a coat rack and photo frames. All you need for this is a couple of small nails, tabs, or caulk depending on how you want to hold in the new glass. You might also want to lay down a sheet under the door before breaking the original panes.
After that, you just take measurements and have your local glass shop cut some new panes. They can also usually install them for pretty cheap if you want to save some time.
Upcycle An Old Ladder
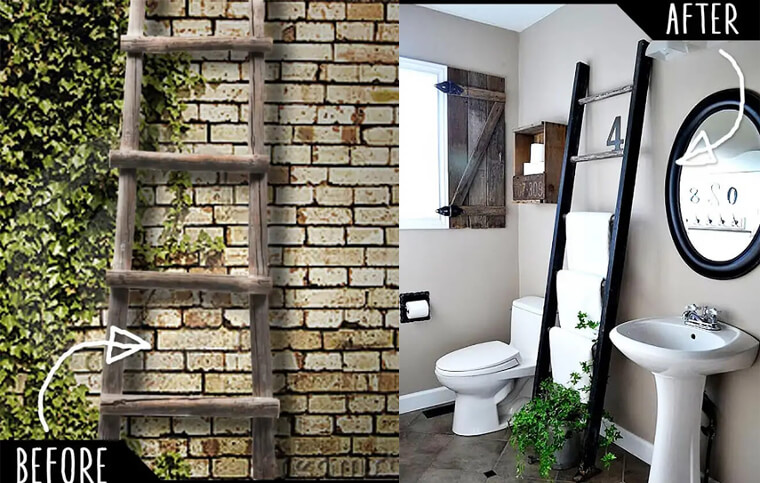
Ladders are also great items to repurpose, as long as they are made out of solid wood of course. Somebody upcycled this old ladder into a towel holder and threw it in their bathroom to give the space a more rustic look. The best part is you basically don't need to do anything. You just take an old ladder and hang some towels on it and you're done.
A fresh coat of paint is an option, but personally, we prefer the original patina of the ladder, since the color of the faded wood pretty much goes with everything.
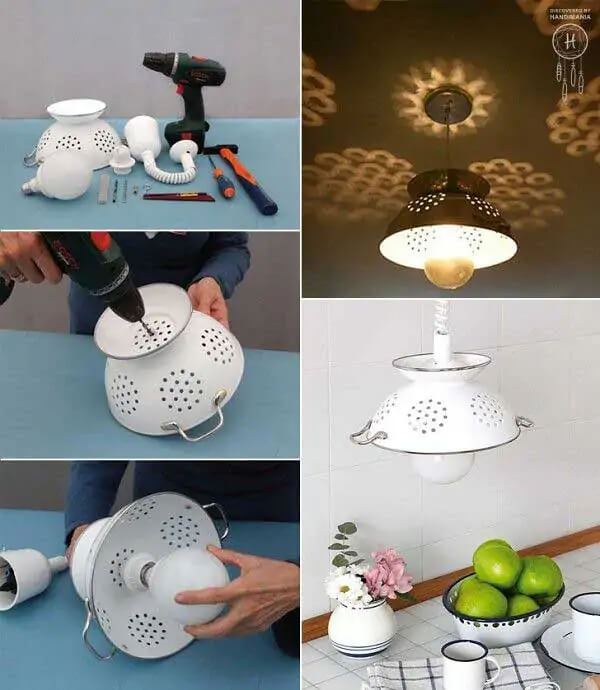
DIY Light Fixture
If you ever find yourself in need of refreshing your light fixture then you might have a perfectly viable option in that colander that's sitting in your kitchen. The steps for this a simple and directions can be found around the internet. Most home supply stores also sell simple conversion kits that allow you to wire your new fixture easily. Bonus points if you use a vintage-inspired colander like the one seen here.
Of course, extra bonus points if you go a step further and use a vintage-inspired bulb sometimes referred to as Edison bulbs. Just make sure to not use white light.
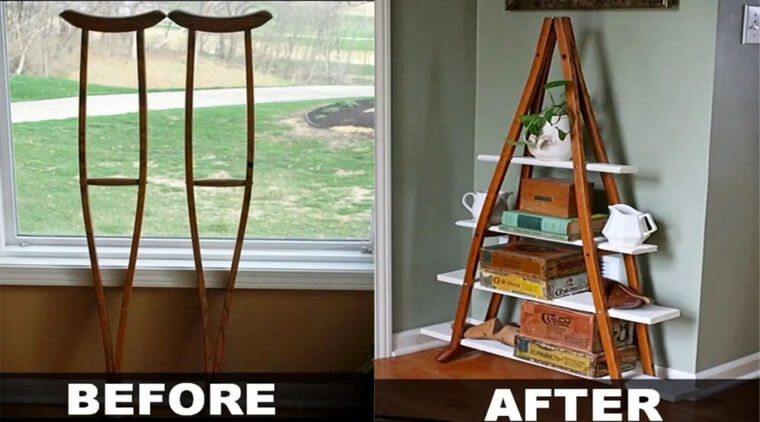
Repurpose Old Crutches
If you or someone in your family has ever had an unfortunate accident that left them in crutches, then odds are those crutches are still lying around somewhere collecting dust. However, they'd be better put to use with this crafty idea for a shelf. You don't even need to really use any tools. All you need are a couple of boards with different lengths, which you can slide in to hold the two crutches in place.
It's actually kind of hard to tell you even used crutches when you look at the finished product, which is an elegant shelf you can match with different colored boards.
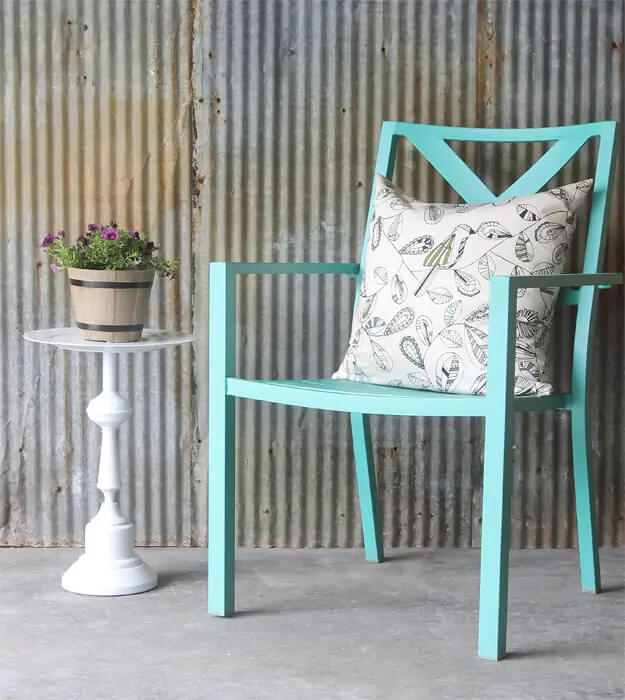
Create A Side Table Or Planter
DIY projects don't get much simpler than this. Someone used an old table lamp and plate and converted them into a side table. All you need is some paint and liquid nails. Okay, you might want to use a saw to off the top portion of the lamp, but sometimes you can do this by simply prying off the top portion or unscrewing it. Just be sure to give the lamp a fresh coat of paint if it doesn't already have some.
Then, you use liquid nails to attach the plate to the lamp. The bond should be strong enough to use as a side table or as a planter if you like.
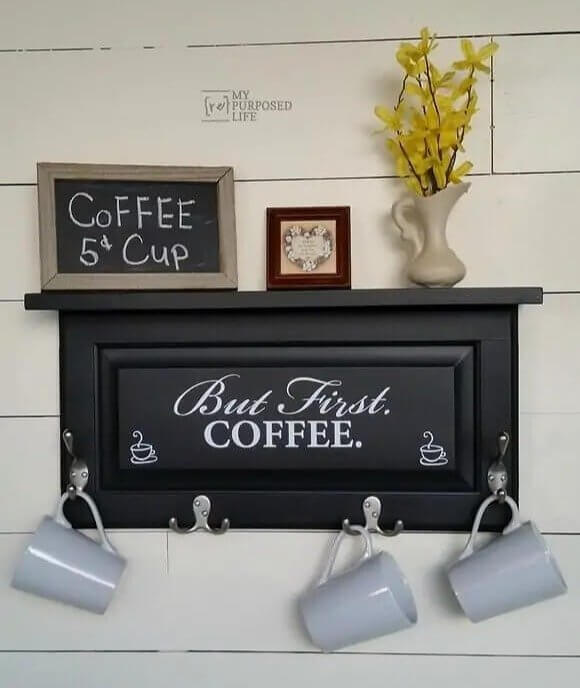
Upcycle Different Furniture Pieces
It's hard to tell just by looking at this photo, but the shelf pictured here used to be part of a cabinet. Someone added a plank for a shelf and some hooks to hang from. You could also use a panel from a door, but the principle is the same. All you need is a drill and some screws and hooks. Oh, and you might need a saw to cut the panel away from the original piece of furniture.
After assembling everything, you can use a stencil to paint this message or a different one depending on what you want. However, we can really relate to the message pictured here.
Build A Shop Sign
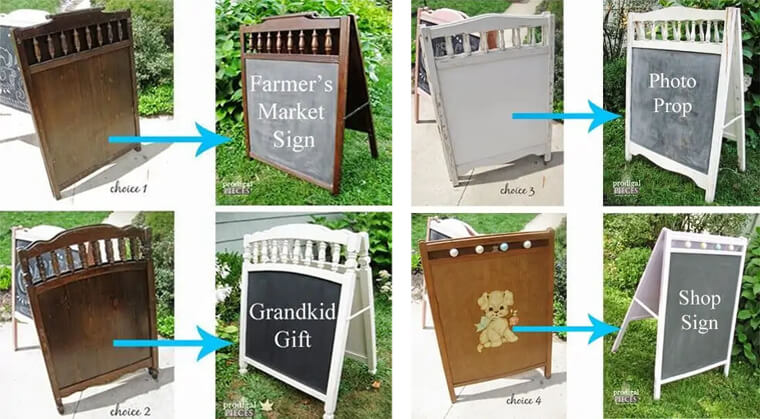
Have you ever passed by a shop or farmer's market sign and wanted one for your own home? Well, they're actually not that hard to make. The sign in this photo was made using the sides of an old crib. However, you could use almost anything including an old frame. If you do plan on using an old crib, especially if you like the spindles at the top, then all you really have to do is disassemble the crib.
From there, you purchase some chalk paint, which is sold at most home supply stores, and then you paint the sides. You can attach a chain or small piece of wood to hold everything together.
DIY Coffee Table And Bookshelf
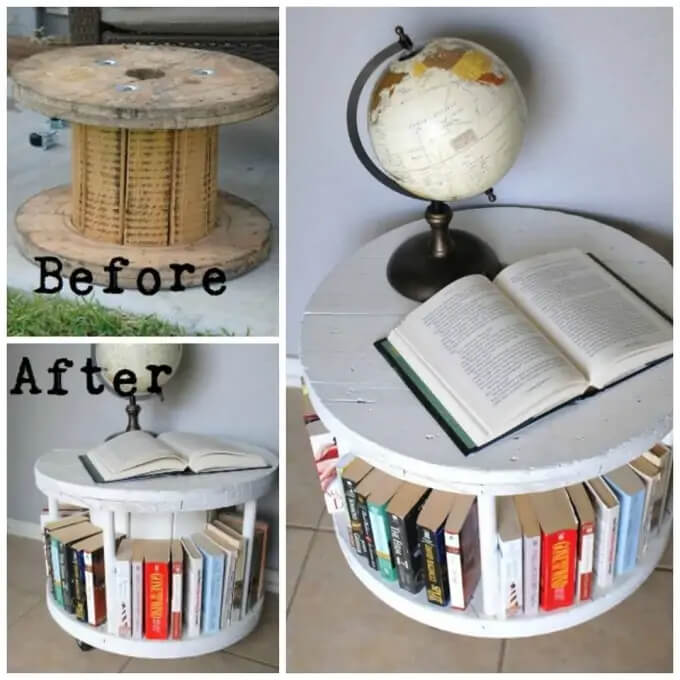
Ever seen one of the things in the top left photo here and wondered what they were? Well, they're actually cable spools and they make for a great upcycling project that doesn't take much effort. All you really need is a little paint and some cylindrical pieces of wood if you want to add a bookshelf. Most home supply stores sell these pieces of wood already turned, which you can then take and cut down to the size you need.
After that's done it's just a case of painting the spool and screwing in the pieces of wood. Afterward, you'll have a combination bookshelf and coffee table with a shabby chic look.
Create Your Own Kitchen Island
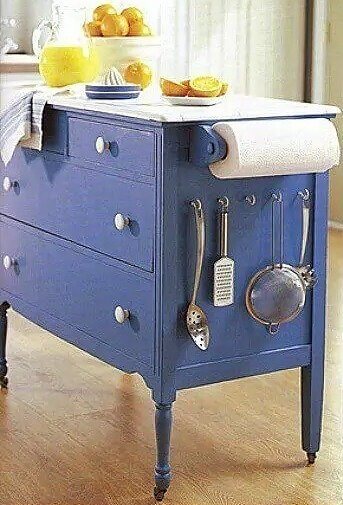
If you have an old dresser sitting in a corner somewhere, you might want to think about repurposing it into something like this kitchen island. Most old dressers also come on wheels, which means you could easily move this thing around depending on how much space you actually need. To do so, all you really need are some hooks and a pre-fabricated towel holder. However, you could go a step further.
If you liked, you could purchase a premade butcher block and attach it to the top of the dresser. This would give you an even harder top to cut on, and you might not feel as bad using that dresser top as a cutting board.
Turn An Old Fridge Into A Cooler
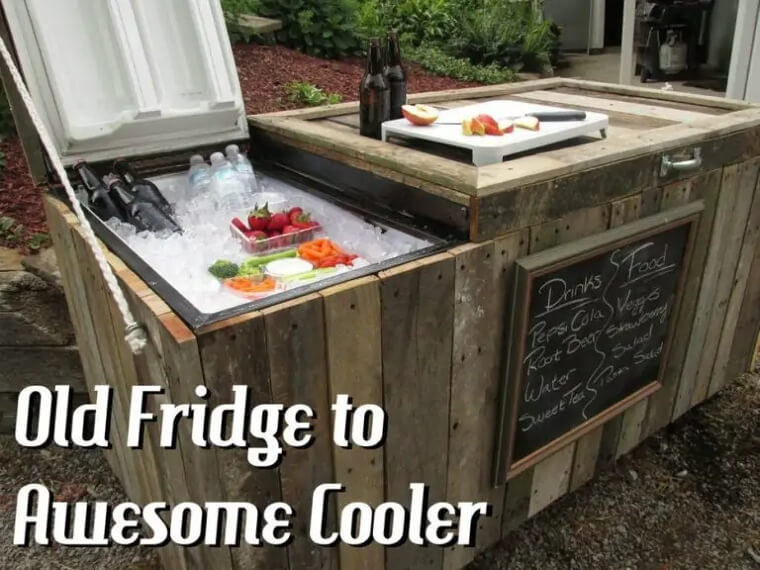
While we hope your fridge has never gone out on you if it ever does then consider turning it into something like this outdoor cooler before you throw it out. You'll cut down on waste, while also gifting yourself a cool new piece for that next get-together you throw. In order to to do so, you just need to build a frame around the old fridge using a drill and some wood.
There are directions all over the web, but it's really not as hard as it looks and it's made easier by the fact you don't have to worry about damaging the fridge, so you could potentially drill straight into it.
Repurpose Old Windows
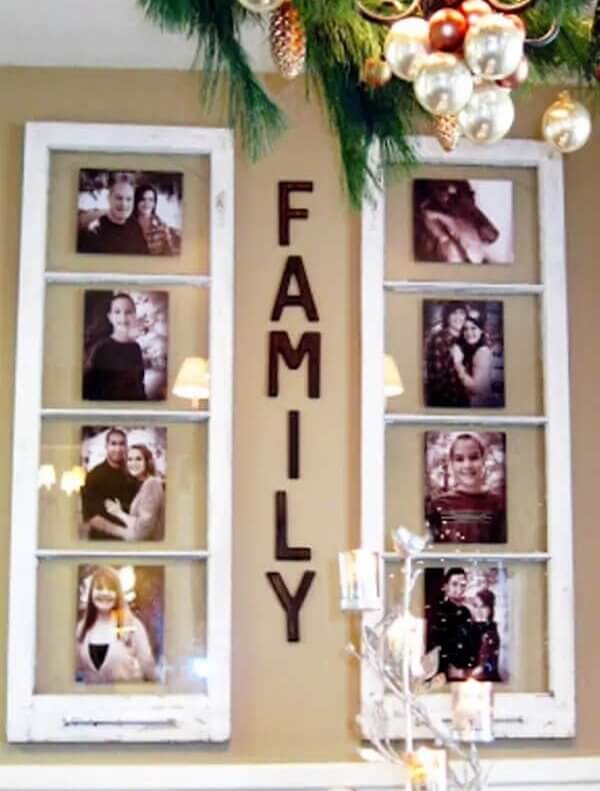
Like doors, old windows are great for upcycling, there's just so much you can do with them. For example, you don't even need to add new panes in order to turn them into great-looking picture frames. They are also great for adding a bit of a farmhouse-inspired look to your home. If you like, you can create an entire focal point around them as this person did.
They also look good above mantels, and if you aren't in the picture frame look, then consider having a few mirrors cut, and replacing the old panes with them. This gives you a great mirror with an even better patina.
Industrial Towel Hanger
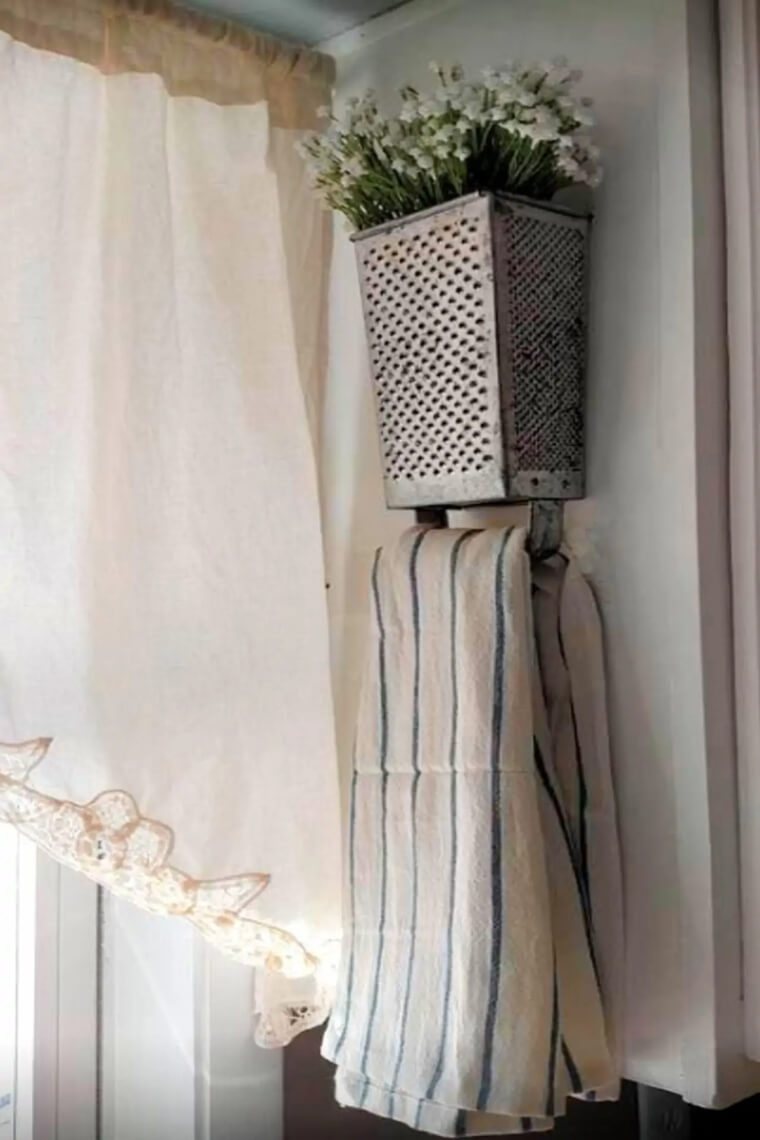
This is a really clever idea to give your kitchen a more industrial look. Obviously, all you need is an old cheese grater that you can then hang on your wall. It can then be used as both a flower vase and to hang your kitchen towels. If you want to give it a more industrial look, you can leave it outside until some rust starts to form on the grater.
Not only does it look great hanging there, but it's also really functional. The larger the cheese grater the better because it'll better hold any towels and just look more like it's meant to be there.
Keep Those Old Kitchen Chairs
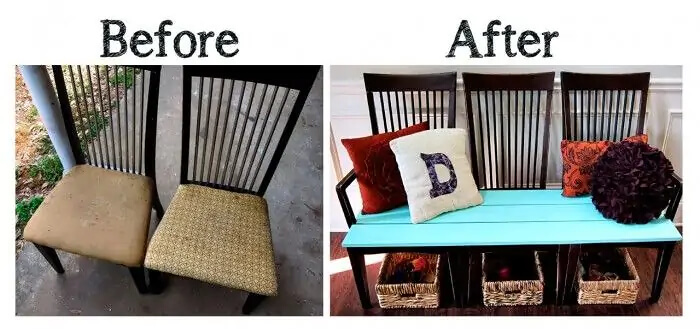
This one is similar to the bench we saw earlier, but with much less work involved. You can even vary the length depending on how many chairs you choose to use. First, you'll want to unscrew the kitchen seats, which are usually attached using four screws. Next, take off the arms you won't need. These are almost always held in place by screws that are covered by wooden plugs. You might have to look hard to find the plugs, but trust us, they're there.
All you need to do after that is cut and then screw down some wooden planks to use as the seat and you're good to go. Of course, you can give everything a fresh paint job if you like.
Create A Wine Glass Holder
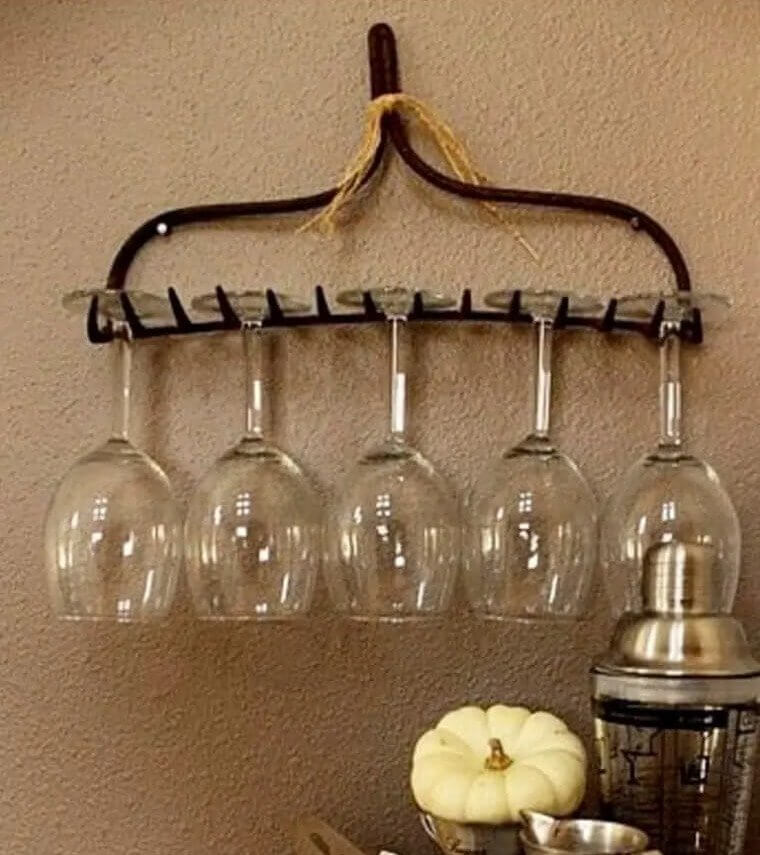
If you aren't in need of something to hold your utensils and spatulas and such, then consider turning that old rake into a wine glass holder. The principle here is pretty much the same as the rake DIY project we looked at earlier. However, you will want to make sure that the rake's teeth turn back towards itself at least a little bit as you don't want those glasses sliding off.
You'll also want to make sure the teeth are a bit longer. But, after you're done you have a great rustic piece to hang near your liquor cabinet or bar area.
Turn A Chair Into A Hanging Shelf
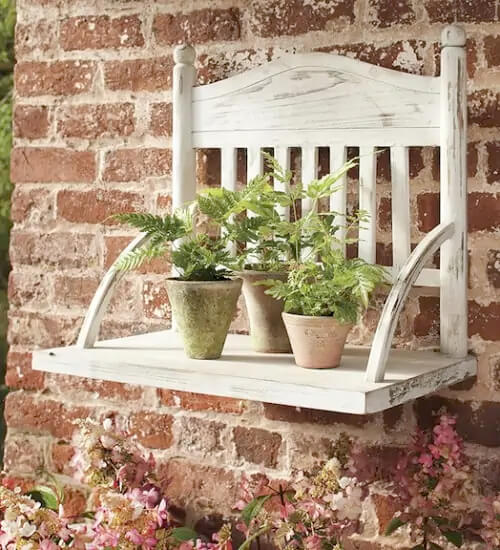
If you have a couple of older chairs collecting dust around the house and aren't in need of a bench then this project might be the one for you. Someone turned this old chair into a shelf by cutting off the back and seat and then screwing them together to create a shelf. The hardest part about this project would simply be to make sure that your cut is even the entire way through.
However, once that's done it's just a matter of screwing everything together. You might also want to make sure the chair you choose has an interesting design and woodwork on the back.
Another Use For Spools
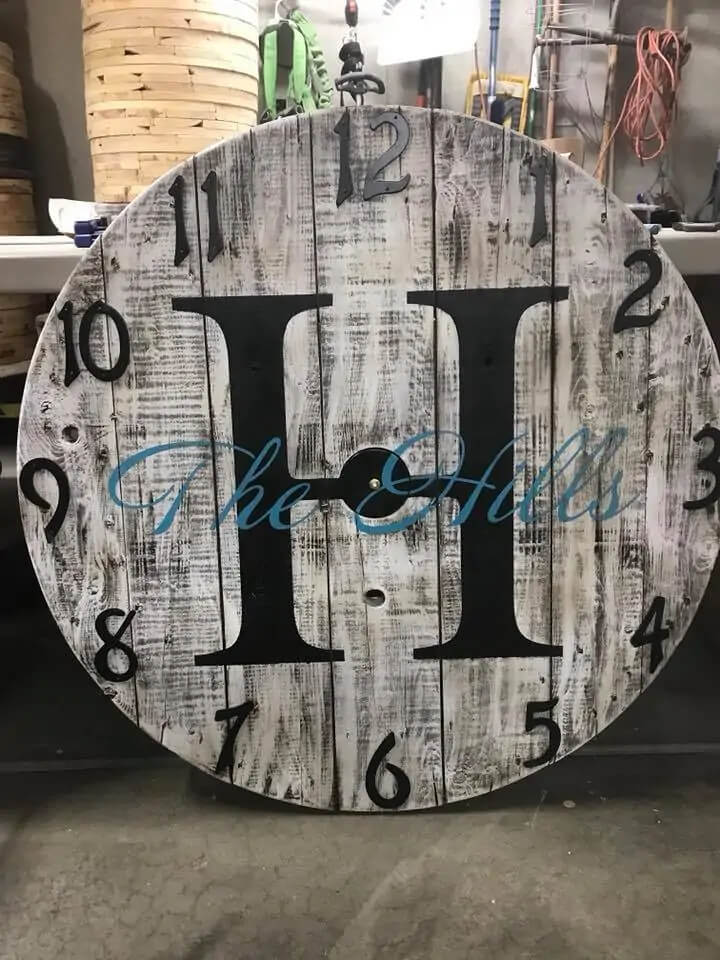
Remember that old spool we took a look at earlier? Well, here's another DIY project that uses just the top of the spool. You cut the top off and paint numbers on it using stencils to create whatever design you like. The clock mechanism this person used to install hands can be found at most home supply stores and they are generally pretty easy to install.
The best part is you still have the other side of the spool to use however you like. You could even create a matching clock for another room or turn it into something completely different.
DIY Greenhouse
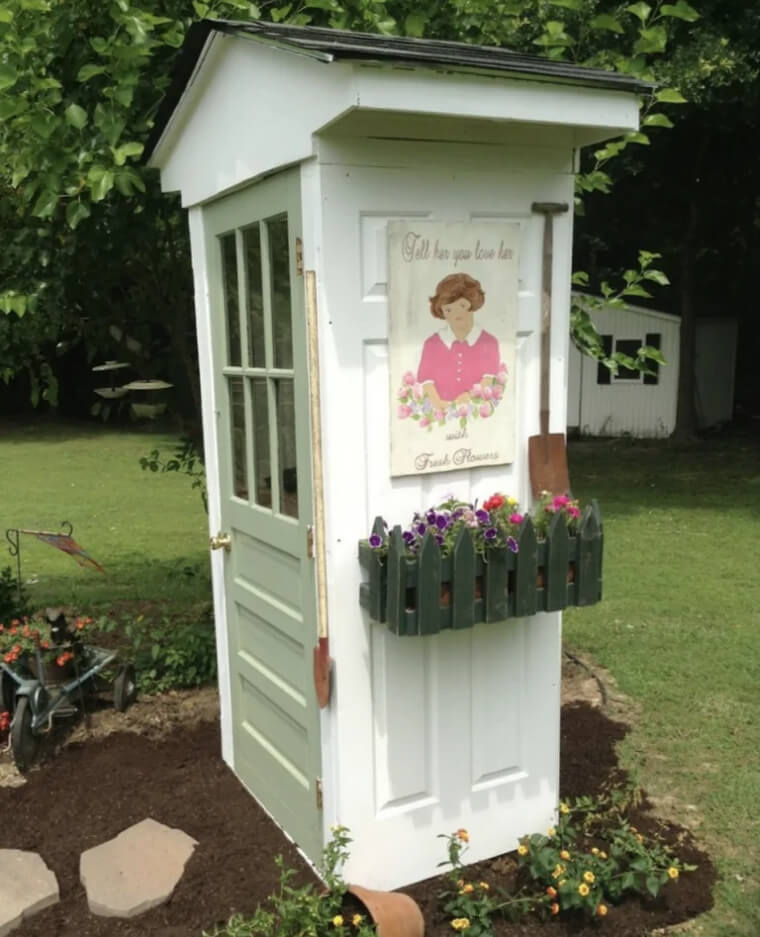
Remember those doors we keep going back to? They're just so versatile it's hard not to. We mean, just take a look at this greenhouse or shed that was constructed using four old doors. The best part about this project is you can make it as simple or as elaborate as you like. The gabled roof could be swapped for a few boards and all you have to worry about aftward is attaching the walls.
This can be done using a drill and some screws. Simple enough, right? You could go a step further and fashion a couple of shelves on the inside as well.
Craft Some Industrial Tables
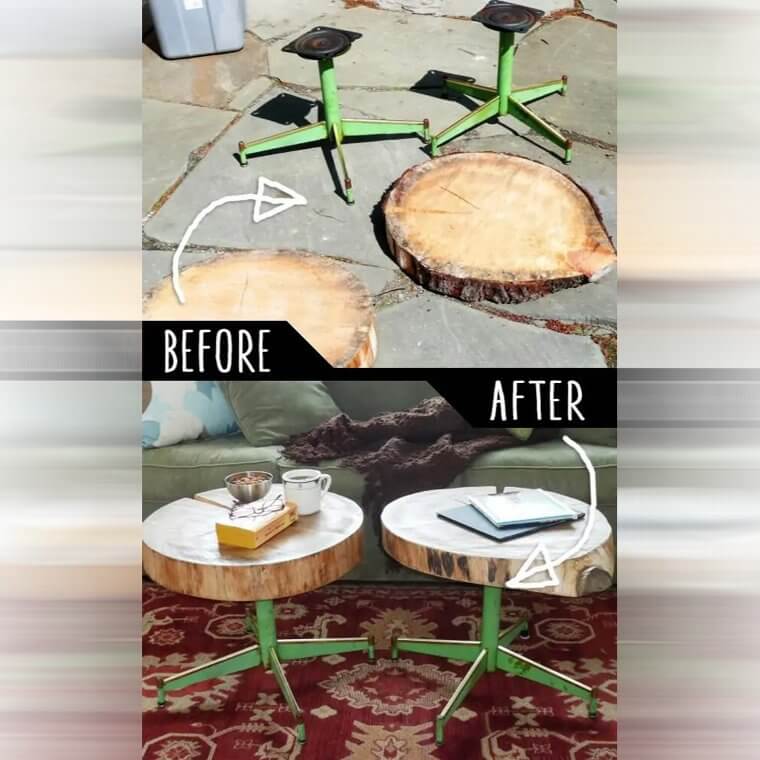
These slaps and pedestals make the perfect DIY project for some industrial-style tables or planters. The pedestals probably came from some old office or school chairs, but you can use just about anything with a decent patina and some chippy paint. Slaps are pretty easy to come by as well and it might be worth thinking about saving some the next time you or a neighbor has a tree cut down.
Then it's simply a matter of screwing the two together. You might also want to sand down the slabs. If you like, you can also take a chisel and hammer and remove any unwanted bark.
Upcycle An Old Cabinet
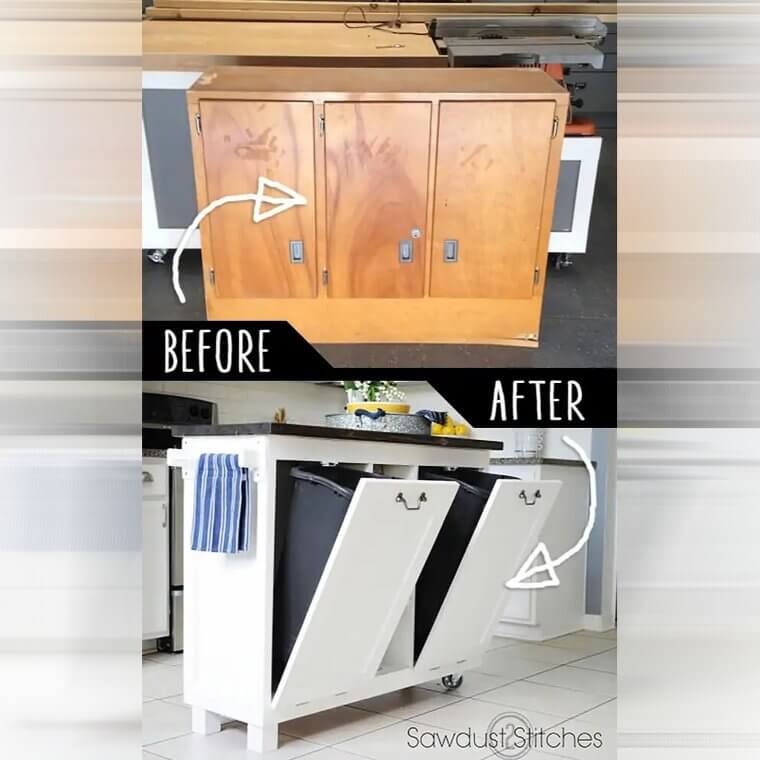
When you go to upcycle an old piece of furniture, it's vital that you pay attention to the original piece's dimensions and form. This cabinet-turned kitchen island is a perfect example. Unlike the dresser island we looked at before, this person was able to create different bins to hold trash cans and just about anything else they might want inside. There are more detailed directions out there on the internet, but construction wouldn't be too hard.
You would just need to unscrew the original doors and then add some hinges to the bottom or use the ones you took off if they're strong enough.
Repurpose Dresser Drawers
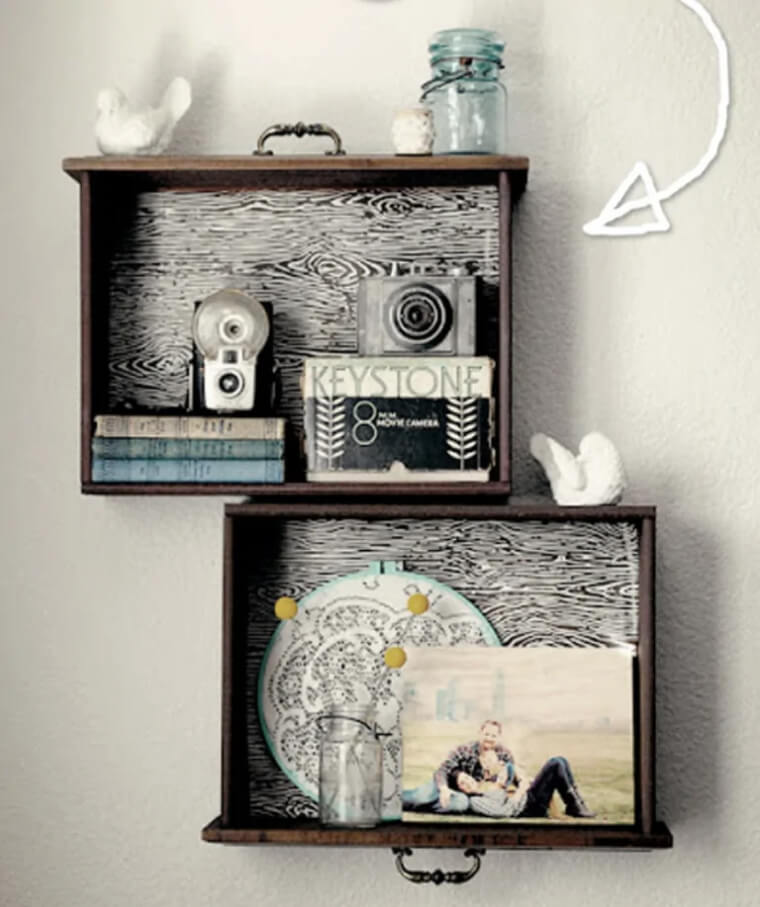
This dresser drawer project is about as simple as they come. This person simply took some spare drawers and repurposed them into a couple of display shelves. Odd drawers are fairly common to come across at flea markets and antique shops as well. The best part is that they're pretty cheap as they're missing the original dresser. If you like, they can also be painted and you don't even have to glue down any paper if you don't want.
These would make for some pretty cool bookshelves as well. Just remember to keep an eye out the next time you are out shopping for antique furniture.
Create A Personal Patio
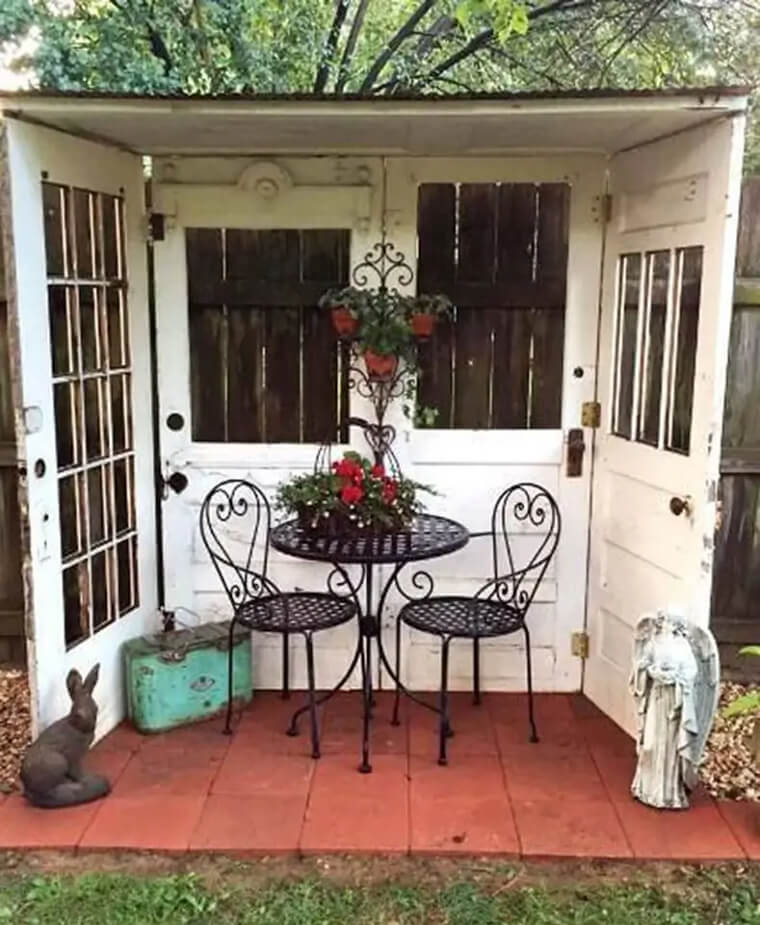
If you have four doors lying around and are in need of a small shed, then this is another viable option. These doors are connected using only hinges and they look pretty good. The patio shown here would make for a great coffee spot, especially with the shade provided overhead. The door on the top also adds stability so you wouldn't have to worry so much about it falling over.
However, you would probably want to place it somewhere that's even, such as on a layer of bricks or on a slab in your yard somewhere. But, besides that, all you need is a screwdriver and some screws.
Create That Dream Coffee Station
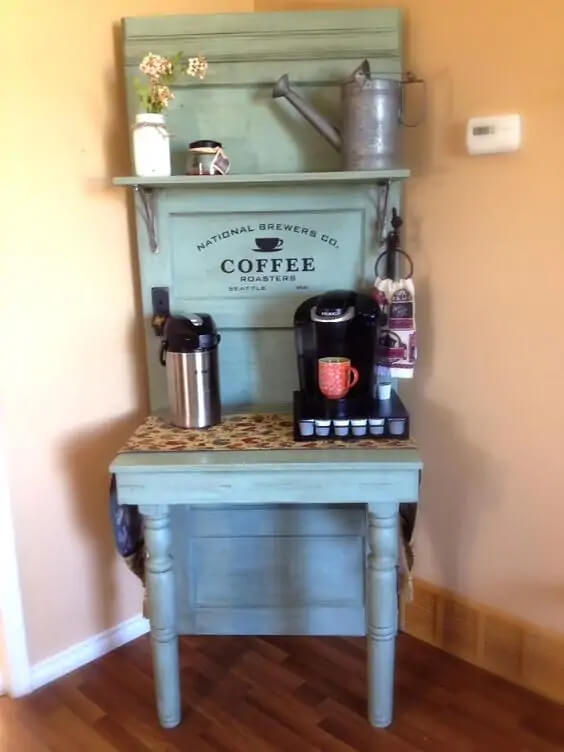
Another great use of an old door, someone fashioned their own coffee station in this photo. All they did was screw an old door to a table that on its own wouldn't be good for much. They even added a little shelf on top for extra storage. The writing on the back was most likely done using a stencil, which would be easy enough to paint. Besides that, there's not much else to this DIY project.
If you don't happen to have an old table around the house, you could also use some planks to make a shelf. You can then attach some turned legs to the bottom of the shelf, but these are easy enough to buy.
Furniture To Potting Table
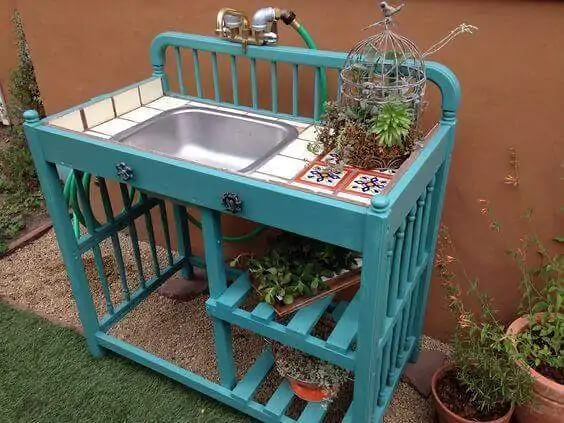
While you don't necessarily have to use an old crib for this one, the original piece is the perfect shape and it wouldn't take much to convert a crib to a potting table. However, you would have to make some cuts using a saw for this one. You would also need to install a sink, which is as easy as cutting a square and then placing your drain inside.
The rest of this piece is made up of simple planks and wouldn't take too long to fashion. You could even add or subtract a couple of shelves depending on what you needed.
DIY Child's Desk
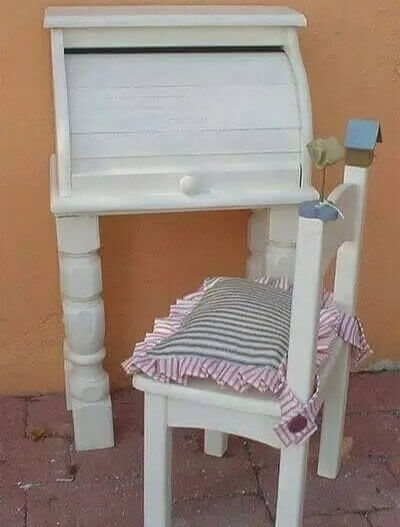
If you have a small child and have tried buying them a desk then you probably know how expensive they can be, especially considering they'll quickly grow out of it. So, consider making your own. All you need are a couple of legs, which you could get from the store or an old table, and a bread box. The bread box is pretty much the same as a secretary, only scaled down.
Throw a fresh coat of paint on everything and attach the legs and you have a child's desk. Now, if your child actually uses it is another matter altogether.
Another Desk Idea
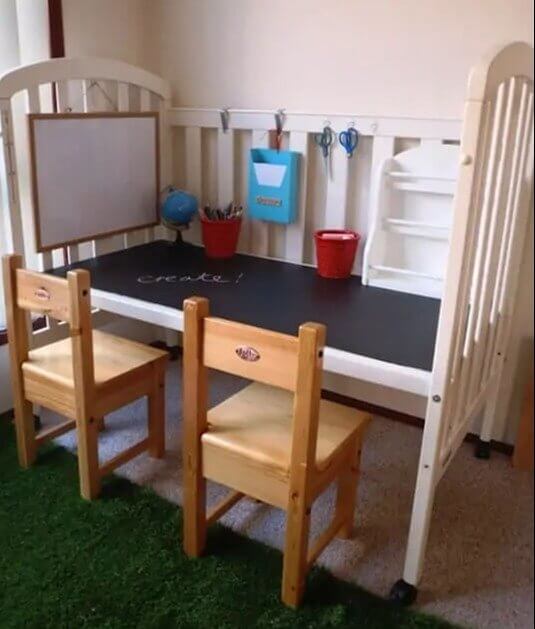
If your child is a bit bigger then they might need a larger desk to fit their size. They're also probably too big to fit in their crib at this point as well. This DIY project is a great way to turn that old crib into a full-size desk. All this person did was remove one side of the crib and apply some chalk paint to the bottom to create a play area.
It's also pretty easy to hang toys and other household items from the side of the crib after you finish everything. You just might want to be careful the kids don't get on top of it and start jumping around, but that's the case with just about any piece of furniture.
Bookshelf To Cubby Space
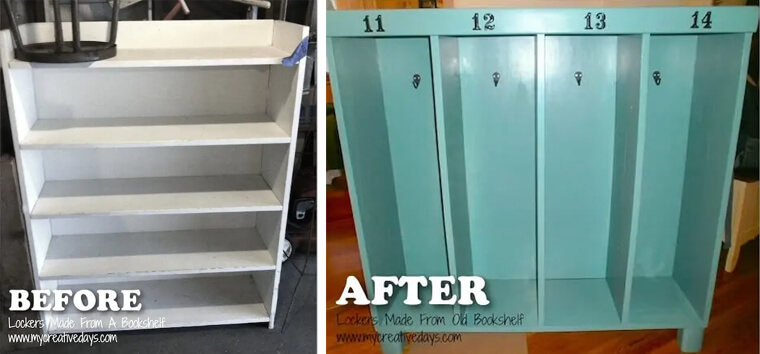
We're sure you or someone you know has used a bookshelf as a place to store shoes. Well, this is kind of the same idea only with jackets. Someone repurposed this bookshelf by rotating it and adding some block feet to the bottom. They also gave it a new coat of paint but that's totally optional. The coat hooks seen here can also be purchased just about anywhere.
However, we do like the numbers they painted on, which give it a more industrial feel and are reminiscent of an old locker. These can be painted by hand or through the use of stencils.
Give Those Chickens A New Home
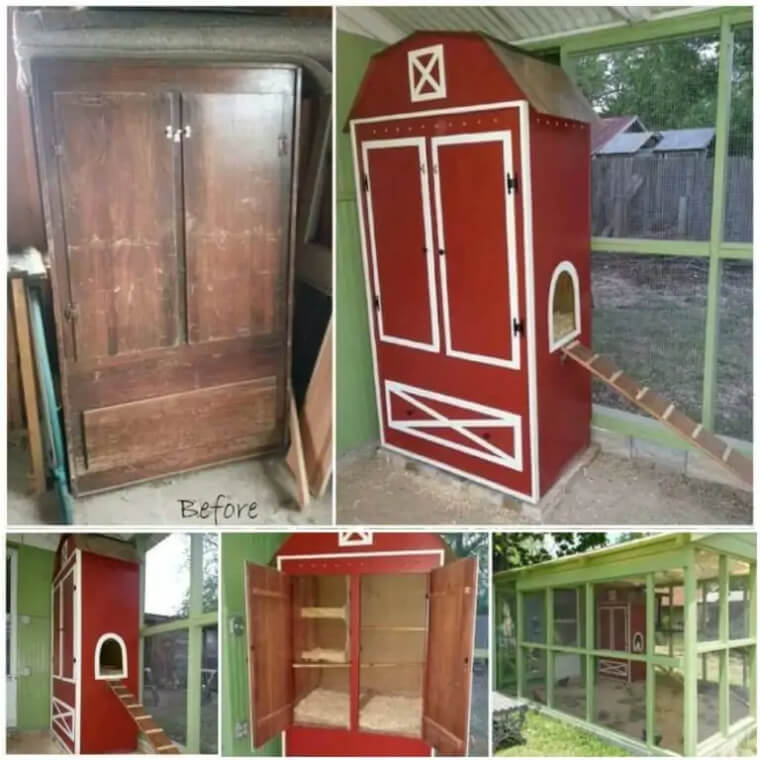
This DIY project is pretty ingenious. Someone took an old armoire and repurposed it for use in their chicken coop. They even gave it a barn-themed paint job. While you don't have to go that overboard with it, this is a pretty cool paint scheme. To make your own, all you really need to do is cut a hole in the side and maybe throw some boards in the main compartment if yours doesn't have a bottom.
You could probably even leave the shelves in to give the chickens a bit of space apart if they want. Lay down some hay and you have yourself a new chicken coop.
Another DIY Clock
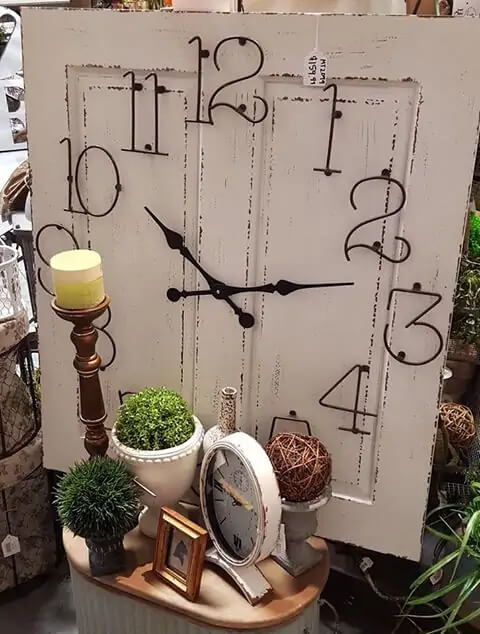
Want a custom clock, but don't have a spool to upcycle one? You could also craft one using a door panel from around your home. You could paint the numbers on or attach some like shown here. These can be found at most craft stores, and of course, a clock kit is pretty simple to install as well. The hardest part would be cutting the panel out, but these are simple cuts just about anyone can make.
After you finish, you'd even have a couple of other panels lying around you could use for other projects shown on this list. Or you could just make another clock.
Repurpose That Old Boxy T. V.
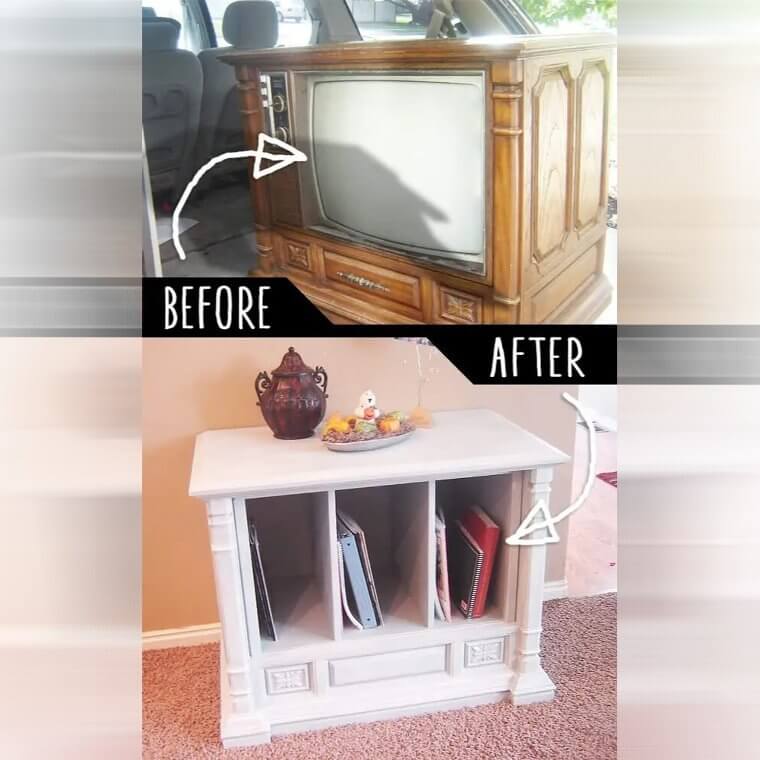
These old T.V.s might be out of style, but they can be pretty easily repurposed into a trendy shabby chic bookshelf. It might take a little effort to get all of the old electronics out but there are usually a couple of screws in the back holding everything together and you shouldn't have to bust any screens unless you want to of course.
After you take everything out, it's just a matter of giving the box a paint job and screwing in a couple of wooden panels.
There Is A Better Solar Lamp
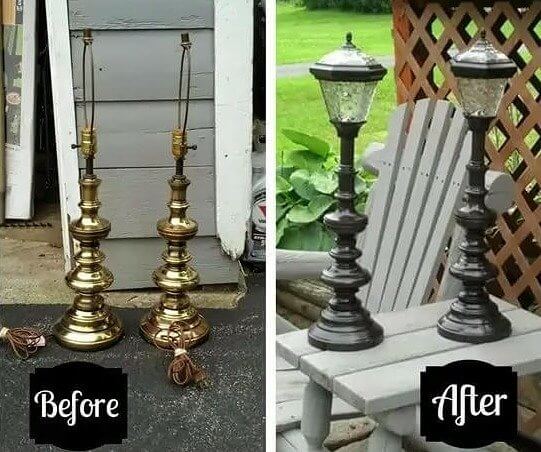
Those solar lamps you stick in your flower bed aren't usually the prettiest things to look at. However, there's actually a pretty clever way to create your own. All you need is a garden variety solar lamp and an old table lamp. Take out the table lamp's old bulb and its housing and then just attach the solar lamp on top using a water-proof adhesive.
You might also want to give your table lamps a paint job beforehand, especially if they're brass like the ones shown here. There's no use in replacing an ugly solar lamp with an ugly table lamp.
Fashion A Mason Jar Light Fixture
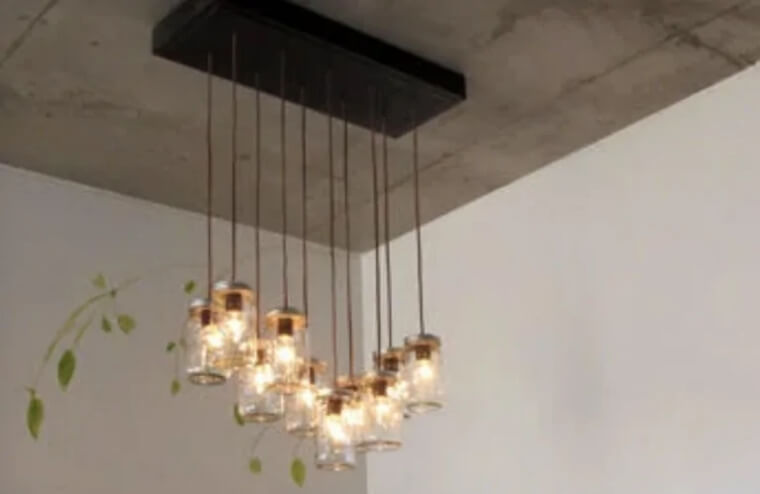
This is a pretty popular trend, but it's for good reason. Mason jars look good in just about any application and anywhere in your home. All you need for this project is a hanging light fixture and some jars. Make a hole in the jars' lids and run your wire through. Some hardware and home supply stores even sell kits you can use to make your own fixture.
Bonus points if you use vintage-inspired bulbs, but this DIY project is a pleaser when done in just about any way. You could also think about throwing some small stones at the bottom of the jars to absorb some light.
Upcycle A File Cabinet
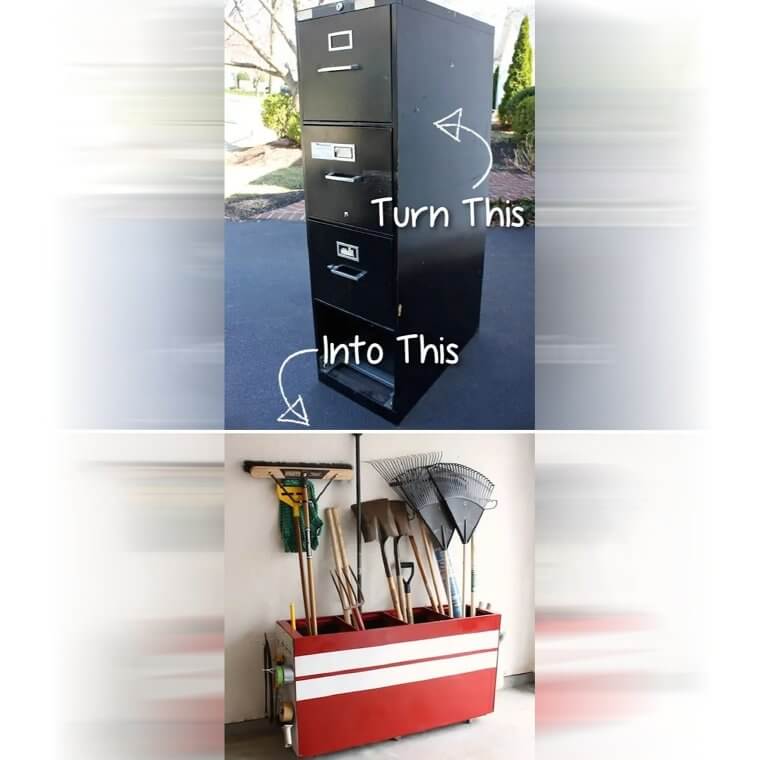
File cabinets aren't the prettiest pieces of furniture in your home, especially if they look like the one pictured here. However, you can upcycle them and create your own tool cabinet to house yard supplies. All you need to do is take the drawers out and flip the cabinet on its side. That's literally the whole process and now you have an organized place to store rakes, shovels, and whatever else you might want.
Of course, you could give it a really cool paint job like the one seen here, which is advisable, but you don't have to. You could also screw in some spools or hooks on the side, but again totally optionable.
Give Your Mason Jars Some New Lids
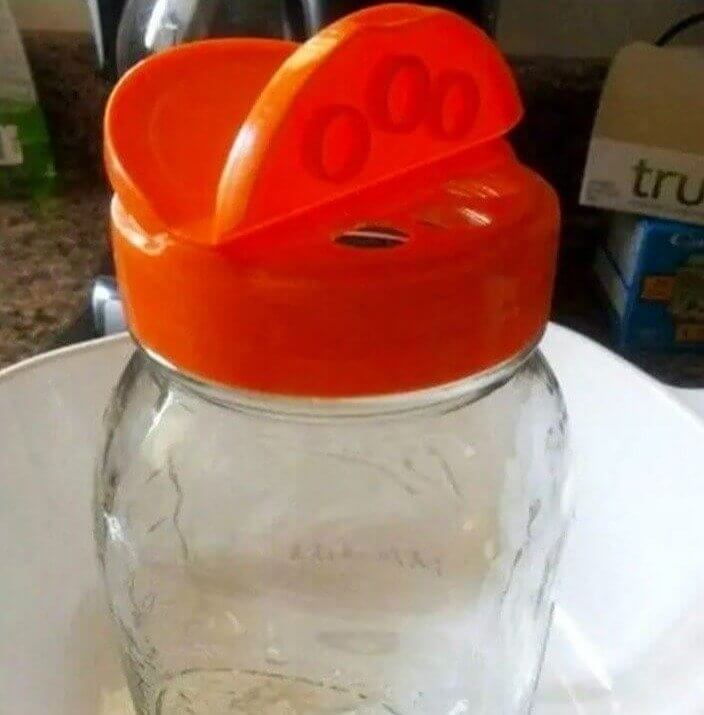
Again, mason jars are great for just about anything. You can use them as cups or you could turn them into containers to store flour or sugar. They even come with handy measurements on the side. If you want a way to pour directly from the jar, then you can save any parmesan lids you might accumulate and throw them on top of the jars.
We even kind of like the bright orange color of these lids. Of course, you don't have to use lids like this and you could also just use the mason jar lids while storing flour and other household items.
A DIY Play Kitchen
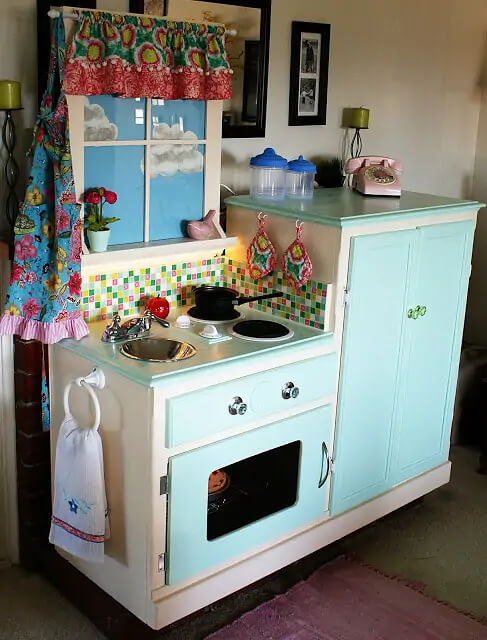
Nothing is cooler than a play kitchen when you're a small child. So, why not make one that's way better than any you could buy at the store? Someone made this kitchen out of an old cabinet they had around the house. It would require a bit of work to take out the bottom left shelf and add some brackets for a stove. But, the hardest part would simply be painting everything.
A window is easy enough to screw into the back and everything else would only require a couple of screws or caulk for the tiles. Oh, and you might have to cut some circular holes for the stove.

